I finished painting! I used Tamiya Surface Primer and Tamiya Light Sand as my final color. I used a paint brush to paint the "Toyota" letters with dark blue acrylic paint. I purchased some hinges on eBay for opening and closing the hood. I used a heavy duty paper clip to hold the hood up when it's open. The interior is primed, but I'm waiting for another nice day to paint.
An R/C fan who likes sharing his passion with fellow R/Cers!
Thursday, January 31, 2013
Monday, January 28, 2013
Toyota Hilux Build- Pt.8
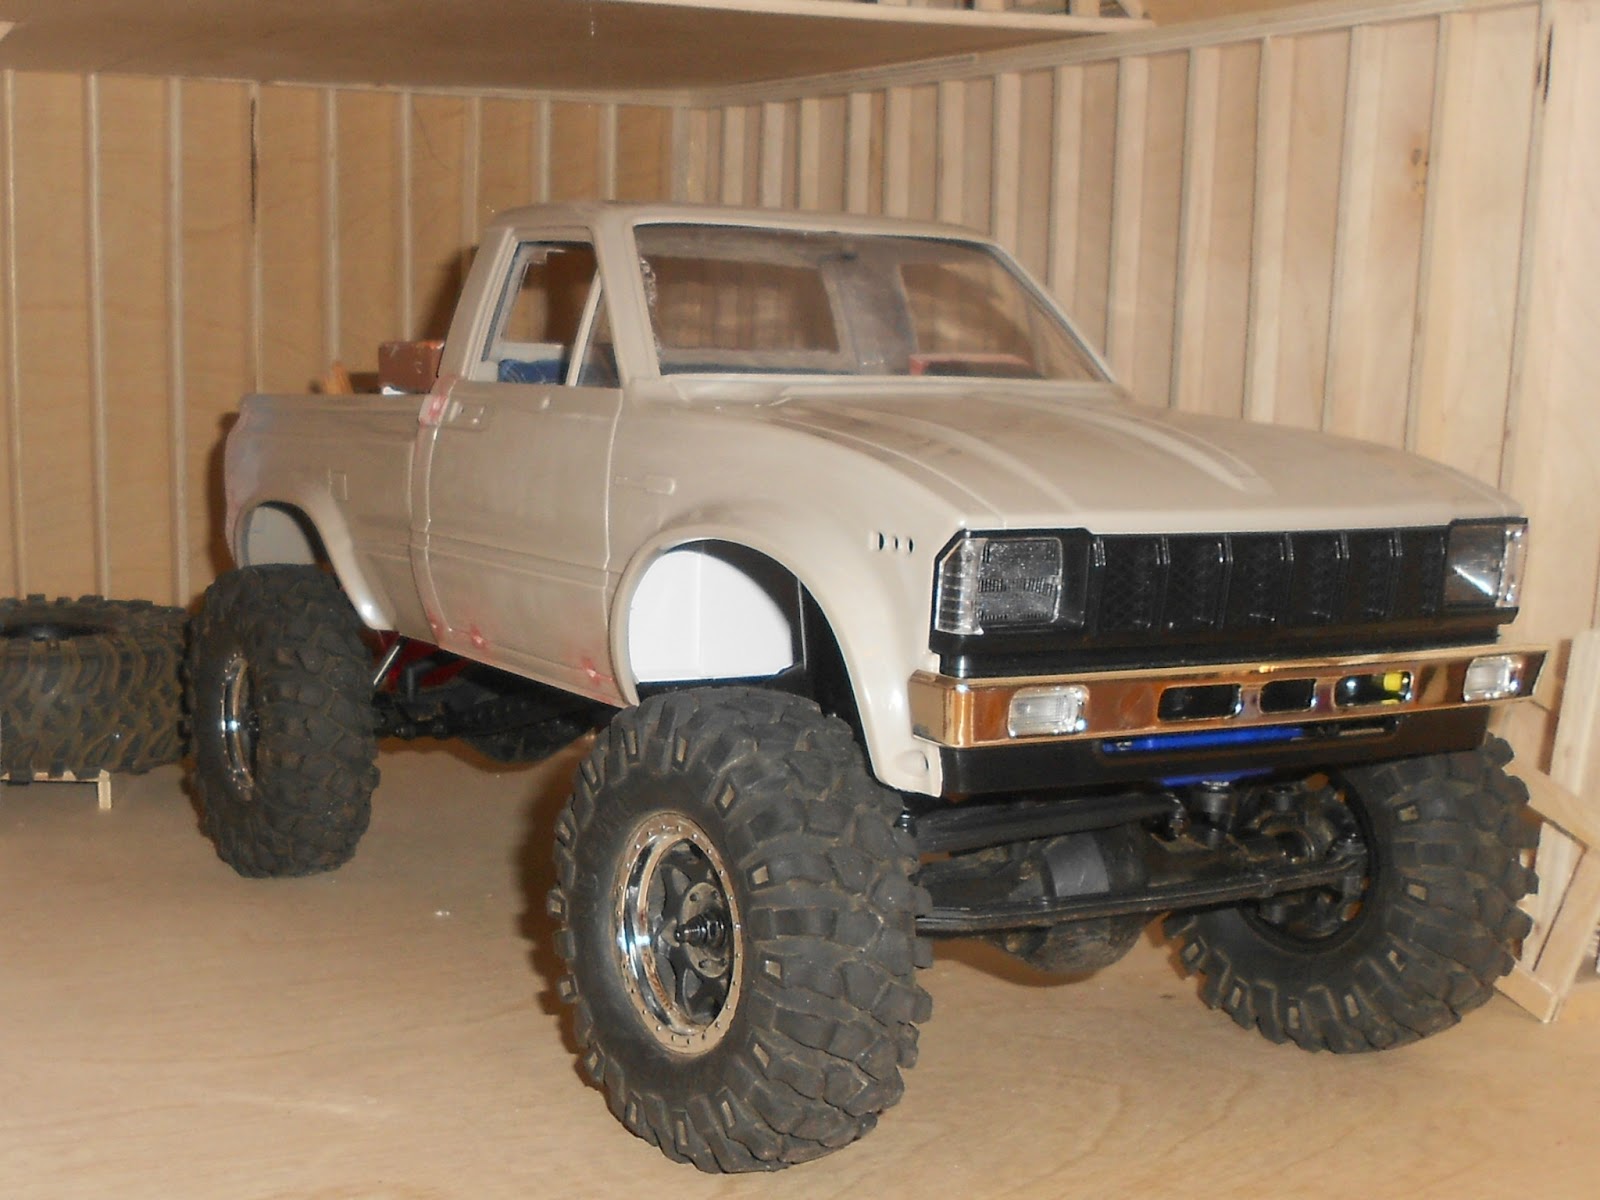
To start off, I used two circular plastic containers to make my wheel wells. I cut them each in half and cut them a little so that they fit inside the fenders nicely. I used plastic cement and a hot glue gun to mount them in the truck body. Don't worry, I still have to paint them, so they will not look like a plastic bowl!Then, I used a dremel to cut holes where the shocks would mount. I placed a Traxxas 2000mah Nimh battery under the hood to see how it would fit, although I will be using a 2000mah lipo battery (these batteries are the same sizes).
After I made the wheel wells, I wanted to see how my exhaust pipe would look. I used two of my jack stands to hold the pipe in the place where it will mount.
Friday, January 25, 2013
Wednesday, January 23, 2013
Toyota Hilux Build- Pt. 6
I have been working on the interior of the the truck quite a bit. I used the stock RC4WD dash that came with the kit and began modding it. I have also been puttying and sanding the bed bob. I had a stack of scale fire wood that I dumped into the bed of the truck along with some scale accessories. A scale lift jack has been mounted to the Turk Box. Wheel wells are next!
Monday, January 21, 2013
Toyota Hilux Build- Pt. 5
My GCM Transfer Case came in the mail a couple days ago. I put it together and installed it in the truck. (I only had two driveshafts so that's why it's missing one.) The t-case looks great and everything runs without any issues.
Tuesday, January 15, 2013
Toyota Hilux Build- Pt.4
Today my bed fell apart... I was able to styrene weld it back together, but it looked shorter...
LOL, don't worry, I just bobbed the bed- awesome! I'm still working on puttying and sanding the sides for a nice look. The inside near the tailgate will look welded. with the body on, the chassis rails are just the right length.
![](https://blogger.googleusercontent.com/img/b/R29vZ2xl/AVvXsEhykZB6SbIgPR60XUUf5hHQ8CRVUQM3rN5of51q_3d7Fkl4VM4RED1uB7B3Zb3IZoazHlOP9uDqBGrmHcdwTMZRuP1F53HqmT6-ZCcWDdWdi8OBa_mHcBXVebAN_xhxSZ0JL87_j4DkDMI/s1600/RSCN6060.JPG)
![](https://blogger.googleusercontent.com/img/b/R29vZ2xl/AVvXsEi-6lNDiz7RQBh7E2oHe2kuprarwSHuUm0a3CBcsa1jcX7WV99s3qdi2RNi5Ct1TEGwMRfqEc3YzmNskcgwOw8vhTgQsZ37rykkdoCVAeO45P7M9RaHMiB67w50pLmlVb9uJtzDUEfvqks/s1600/RSCN6064.JPG)
![](https://blogger.googleusercontent.com/img/b/R29vZ2xl/AVvXsEhayVHOABs8XMubUmIwRb0_yy9NF5YooymZ0aPotcV8PukDRsKOlLKVbB941naIIgpeJJyFAHJF4Cp74jw9jO1nWI0ORQ7AA1qbrR4VPgQ1rKcR2iK8MxkPT4-9tD_eSYWQ5SeBId80u2Q/s1600/RSCN6062.JPG)
LOL, don't worry, I just bobbed the bed- awesome! I'm still working on puttying and sanding the sides for a nice look. The inside near the tailgate will look welded. with the body on, the chassis rails are just the right length.
Toyota Hilux Build- Pt.3
Toyota Hilux Build- Pt. 1
Ok, so I recieved an RC4WD Mojave body for Christmas and I had enough parts to start posting what I've done. I'm using an Axial Scx-10 chassis which I have been modding. I moved the trannsmission to the front of the chassis using a homemade mount. Using some stock parts off the chassis, I made a chassis servo mount. The rear shocks are relocated for the drop bed. The tires shown are what I amusing for the build, I am going to be using different rims. I am awaiting a GCM Racing Transfer case which will mount on top of the center skid plate. I will probably install a leaf spring suspension kit. More to come!
Subscribe to:
Posts (Atom)